
User Permission Management introduces a higher level of administrative control for Sertifier users, allowing organizations to customize access rights for their team members. This functionality empowers account admins to easily assign or limit specific privileges, ensuring that each user has the necessary level of access for their role. This adaptability boosts security measures, prevents unauthorized activities, and streamlines collaboration within the certification process.
- Upon logging in, proceed to the Settings tab in the left menu.
- Within the Users & Permissions section, users have the ability to add or remove team members, adjust their roles, and assign permissions to regulate access to different parts of the application.
- Select Add New User.
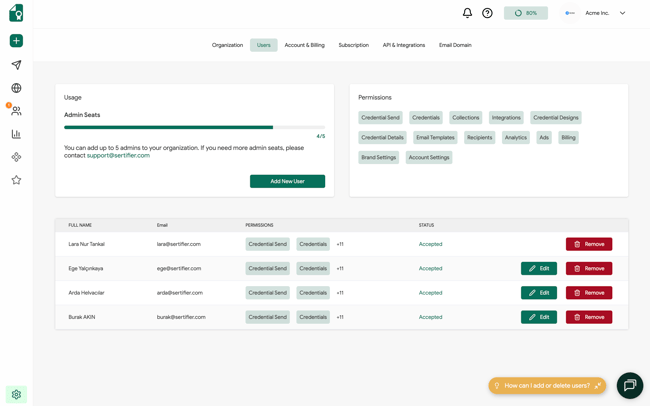
- Enter your colleague’s email address, set their access permissions, and send the invitation. They will be notified via email to join the platform.
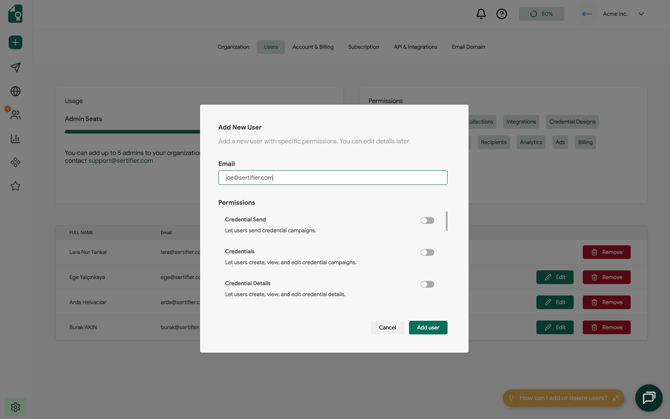
- You can update user permissions or remove admin access at any time.
Admins can view the activities and contributions of other admins, provided they have access rights to the specific page.
Understanding User Permissions
When managing team members within your Sertifier account, you can customize access levels by toggling specific permissions on or off for each user. This ensures team members have the exact access required for their roles without compromising account security or administrative control.
Below is a breakdown of all available user permissions and what each controls within the platform:
1. Credential Operations
- Credential Send (Master Permission): Grants full operational access to the issuance pipeline. Enabling this primary permission automatically unlocks all sub-permissions listed below. However, managers can also grant individual access to any sub-permission without giving full "Credential Send" access.
- Credentials: Allows users to create new issuance campaigns, view existing campaign histories, and edit active draft campaigns.
- Credential Details: Permits users to build and manage structural metadata, such as issuing organization names, skill tags, descriptions, and global validity/expiry settings.
- Email Templates: Enables users to design, draft, and modify the automated email notifications sent to credential recipients.
- Credential Designs: Gives access to the design canvas to build, edit, and update visual certificates and badge templates.
- Recipients: Allows users to manage recipient lists directly, including uploading bulk recipient data via Excel or CSV files, editing recipient entries, and managing recipient profiles.
2. Program Management & Integrations
- Collections: Permits users to group related badges and certificates into curated collections for easier cataloging and public showcase.
- Integrations: Grants technical access to establish connections with third-party applications (LMS, CRM, etc.), and view API keys.
- Analytics: Allows users to view real-time platform performance dashboards, monitor delivery metrics, track recipient engagement, and export detailed Excel reporting files.
- Ads: Enables users to set up, monitor, and manage custom ad banners displayed on credential pages to promote upcoming courses, events, or products.
3. Account Administration & Settings
- Billing: Controls access to financial information, including viewing invoice histories, updating credit card and payment methods, and upgrading or modifying subscription plans.
- Brand Settings: Allows users to define organization-level branding elements, customize verification and credential page aesthetics, and manage custom email sending domain records.
- Account Settings: Grants full administrative control over organization profile details and user permission management for all team members.
Transferring account ownership
You can transfer ownership of your Sertifier organisation to another user directly from within the app. No support request is needed.
- Go to Settings and open the Users & Permissions section.
- Click Add New User and enter the new owner's email address.
- When setting their permissions, enable all available permissions so the new user has full access.
- Click Send Invitation. The new user will receive an email prompting them to log in and accept the invitation.
- Once the new user has accepted and logged in, they will have full admin access to the organisation.
- If you want to remove the previous owner from the account, the new admin can do this from the same Users & Permissions page by removing the old user.