---
title: Sertifier + LearnDash Integration
description: Integration with LearnDash allows you to send automated credentials to your students once they complete a course.
---
[Skip to content](https://help.sertifier.com/sertifier-learndash-integration#main-content)
[Create Support Ticket](https://help.sertifier.com/kb-tickets/new?hsLang=en)
[](https://help.sertifier.com/?hsLang=en)
- [Create Support Ticket](https://help.sertifier.com/migration/kb-tickets/new)
- [FAQ](https://help.sertifier.com/faq)
Open main navigation
Close main navigation
- [Create Support Ticket](https://help.sertifier.com/migration/kb-tickets/new)
- [FAQ](https://help.sertifier.com/faq)
- [Create Support Ticket](https://help.sertifier.com/kb-tickets/new)
- [Login](https://app.sertifier.com/en/login)
[Login](https://app.sertifier.com/en/login)
How can we help you?
- There are no suggestions because the search field is empty.
1. [Help Center](https://help.sertifier.com/?hsLang=en)
2. [Integrations](https://help.sertifier.com/integrations?hsLang=en)
3. [LearnDash](https://help.sertifier.com/integrations?hsLang=en#learndash)
# Sertifier + LearnDash Integration
## Integration with LearnDash allows you to send automated credentials to your students once they complete a course.
**Download Plugin Zip File**
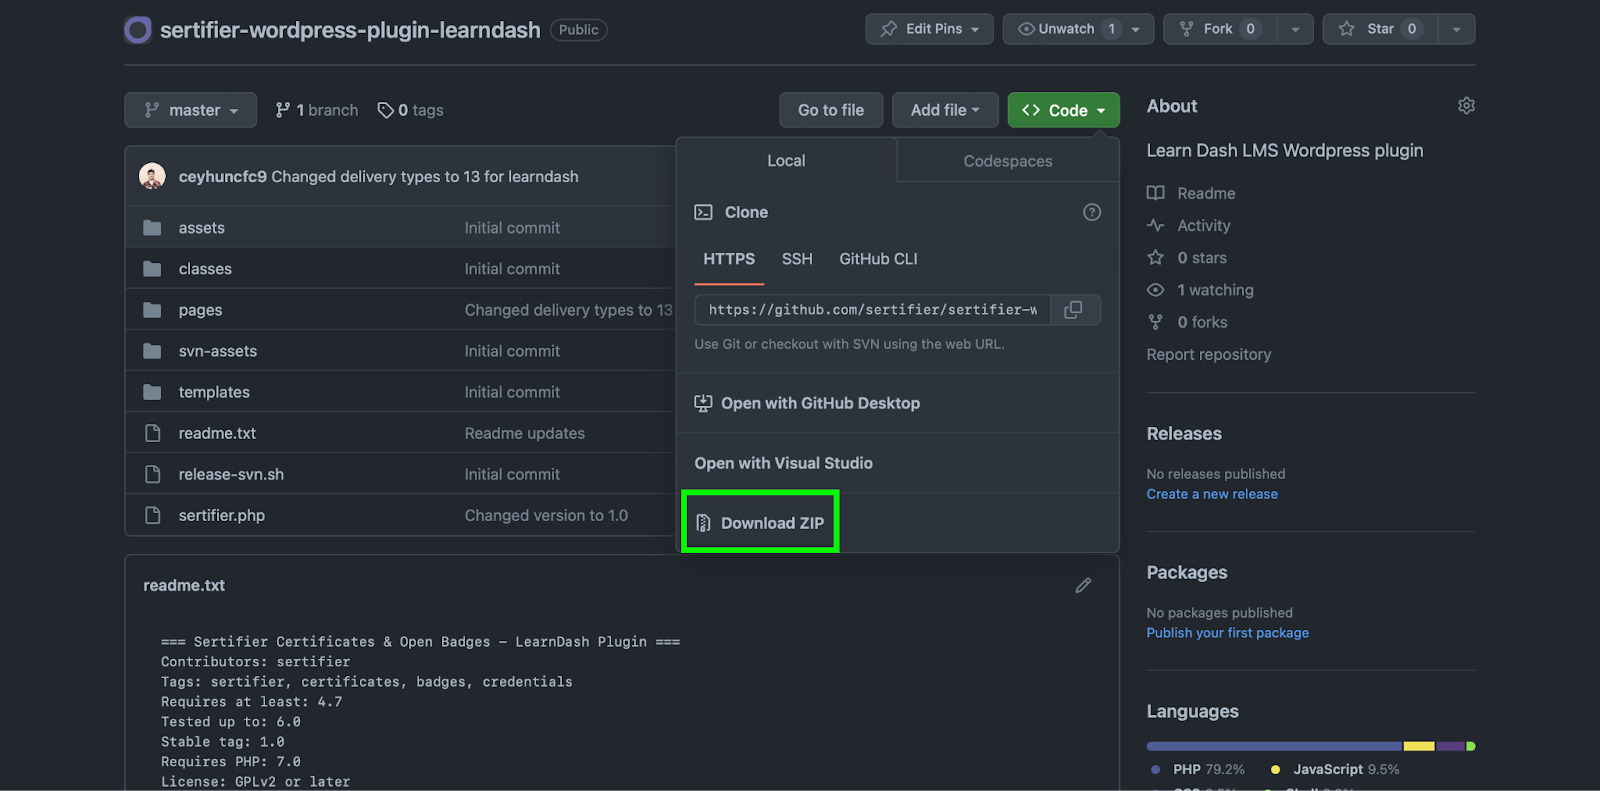
In order to integrate the plugin into your LearnDash website, the initial step is to download the plugin zip file. To do this, you can visit [this](https://github.com/sertifier/sertifier-wordpress-plugin-learndash) address. Then, click the green top right button and click the “Download ZIP” button.
**API Key & Integration**
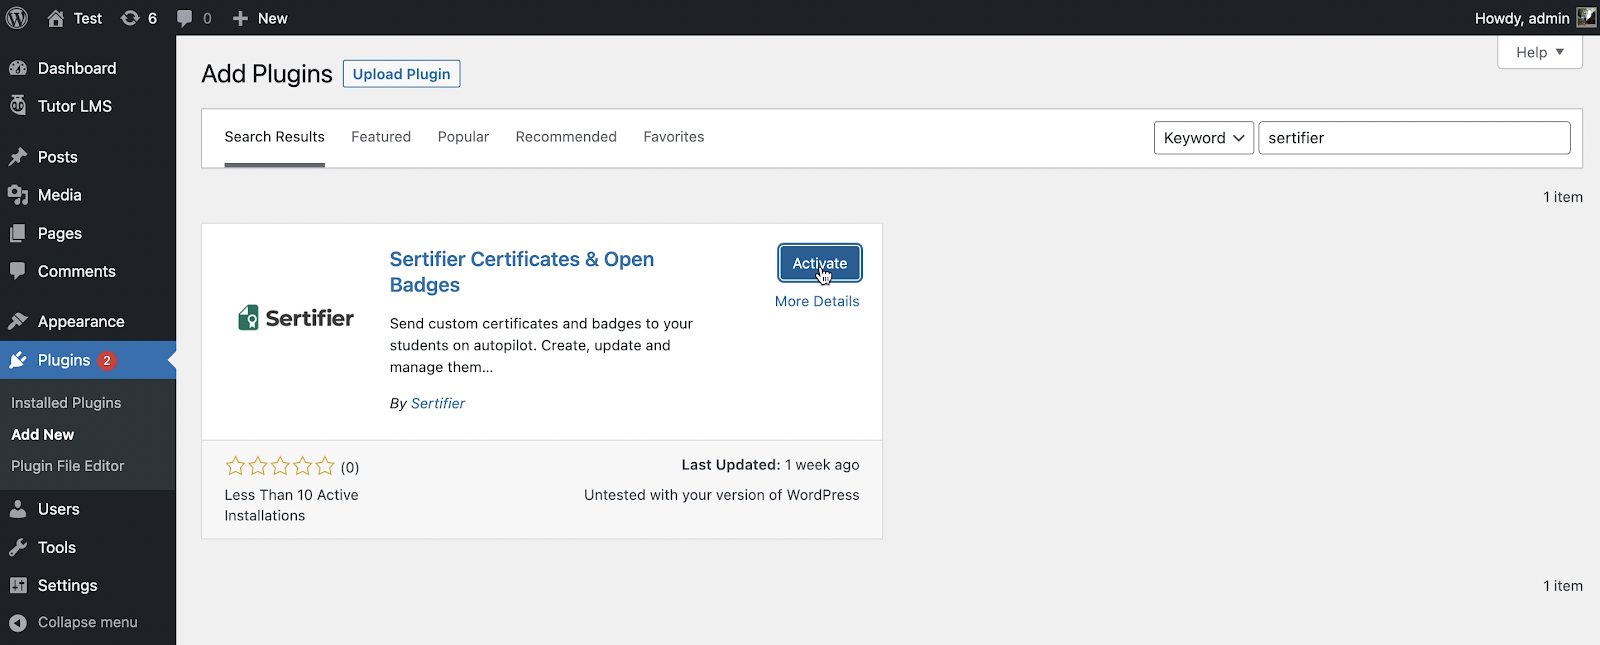
Simply begin by logging in to your LearnDash account, go to the *Plugins \> Add New* from the left menu and click “Upload Plugin” at the top left corner of the page. Then, upload the plugin .zip file and click install. After installing, you can active the plugin to start using the integration.
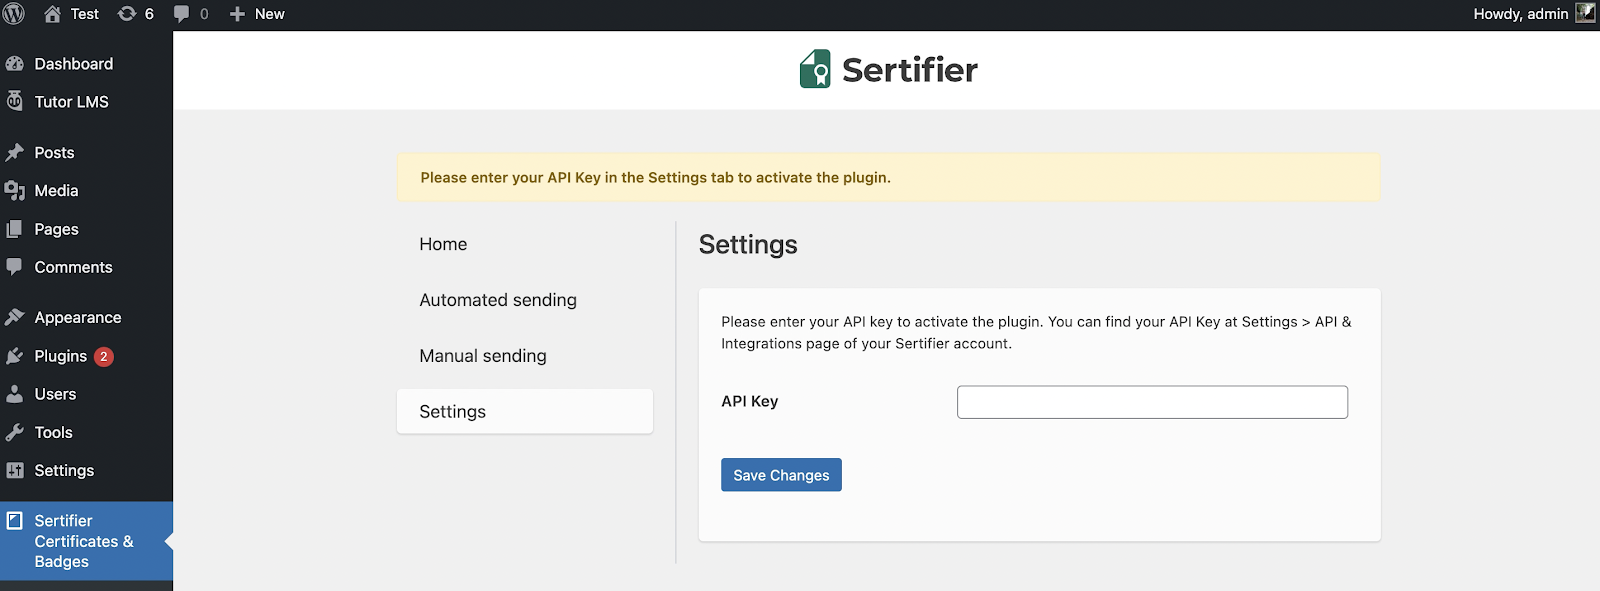
Once you activate Sertifier, click on *Sertifier Certificates & Badges* tab from the left menu, and click *Settings*. Now, you should enter your API key to activate the integration.
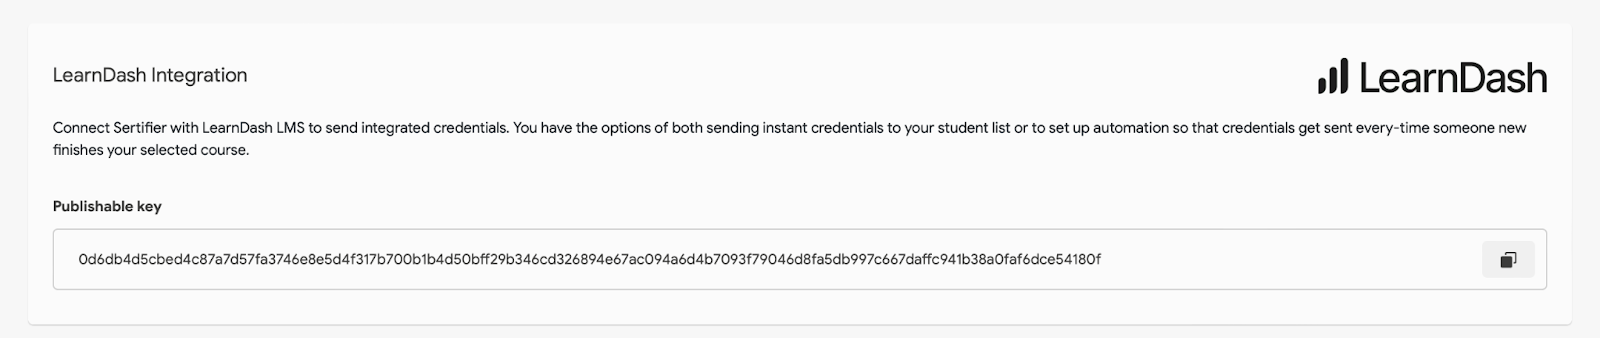
You can have access to your API key from *Settings \> API & Integrations* when you log in to your Sertifier account. Copy and paste that code to the API Key field, and then proceed.
**Creating Integrated Credentials in Sertifier**
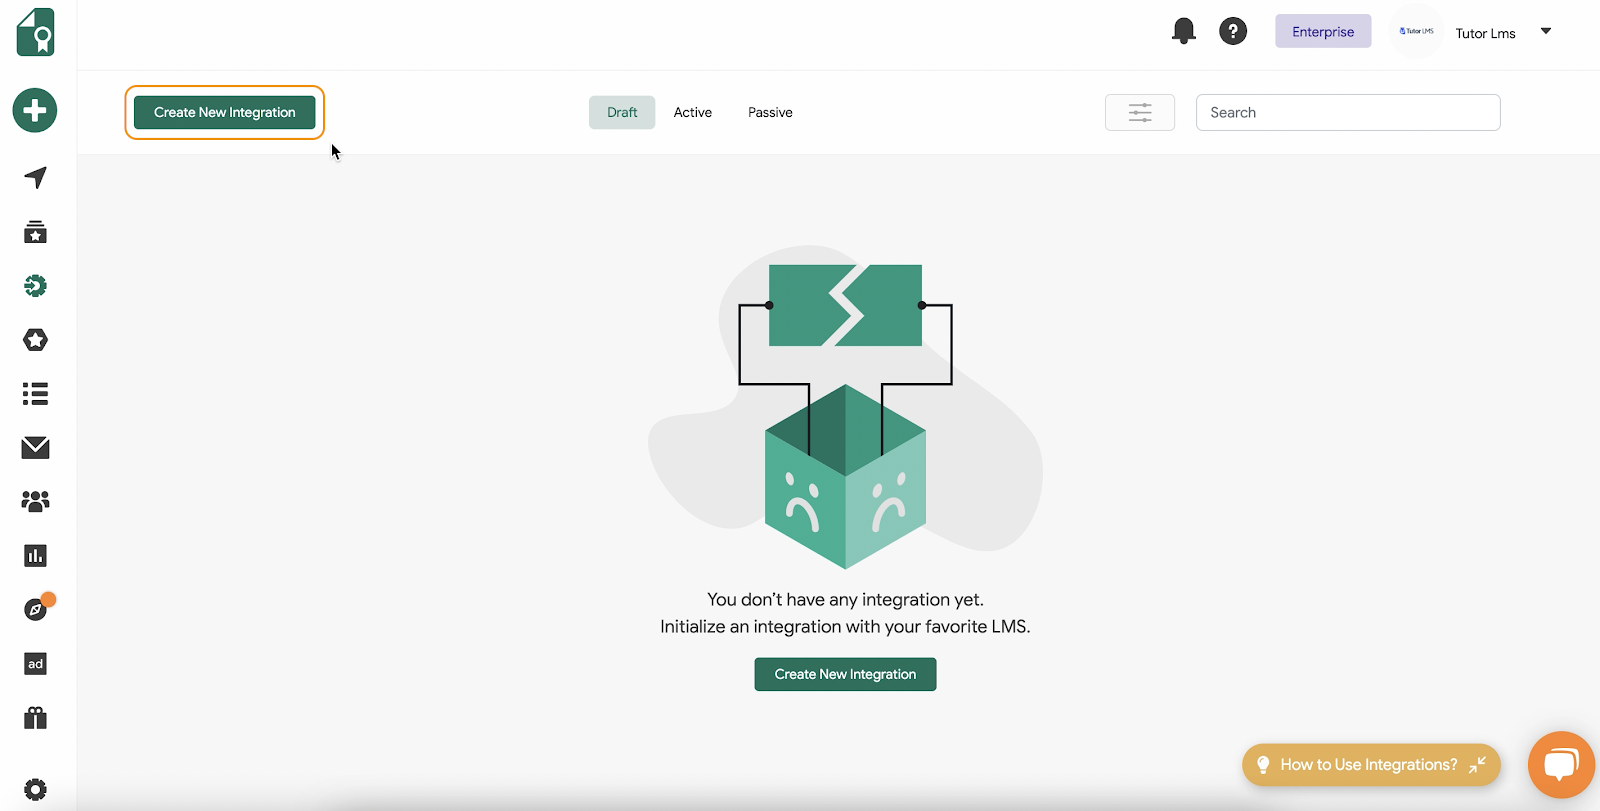
Go to your Sertifier account to integrate your digital credential for sending. Go to the *Advanced \>* *Integrations* tab from the left menu, and click the *Create New Integration* button.
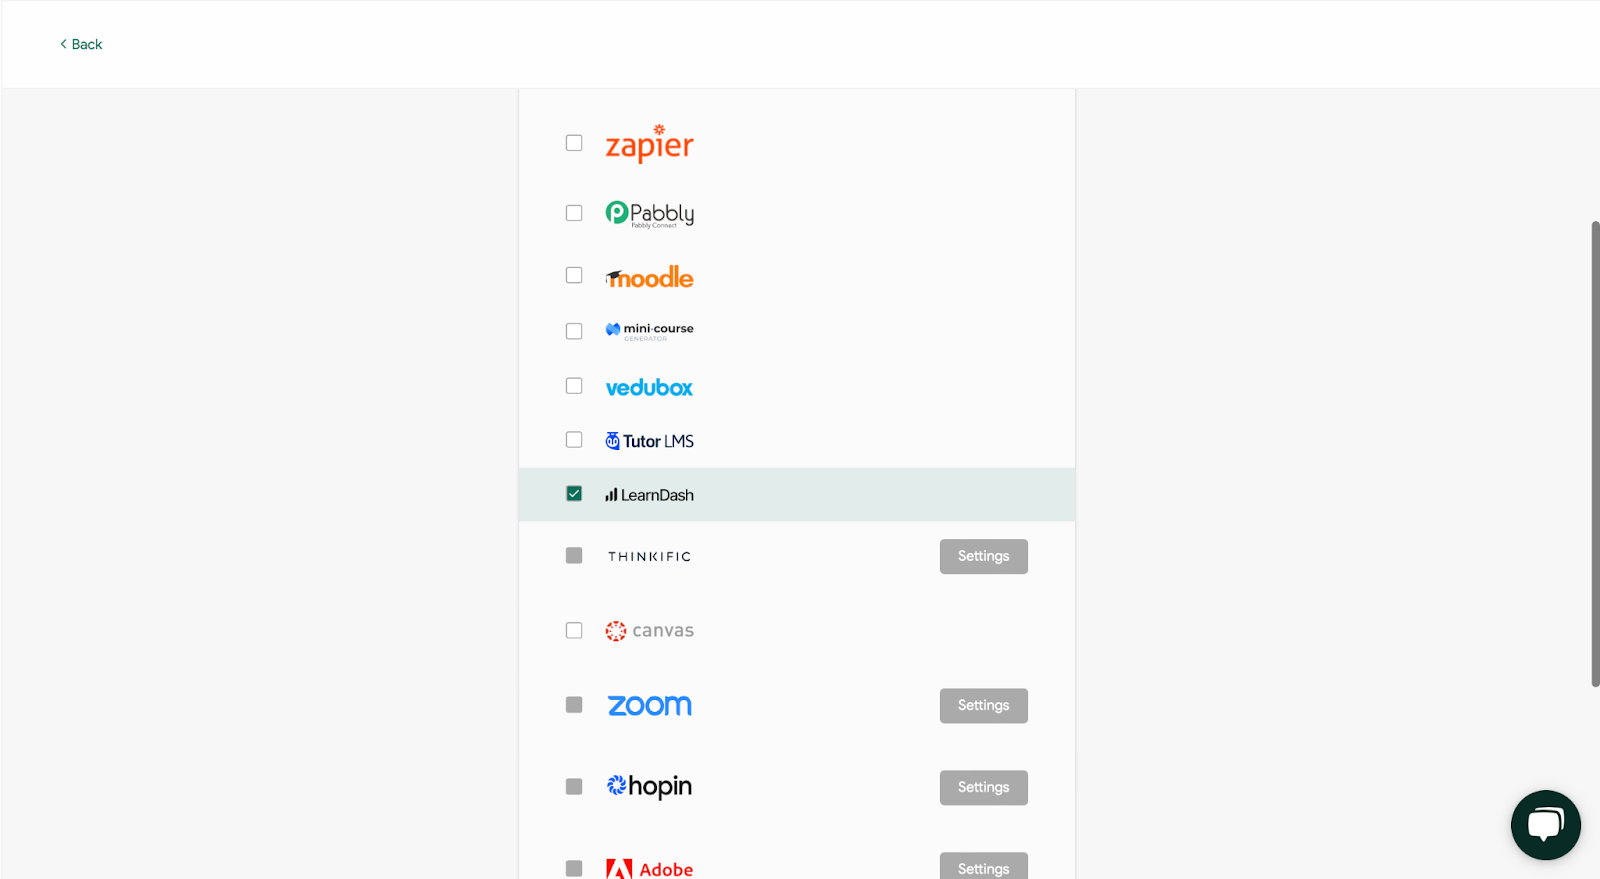
Select the LearnDash from the integrations list and proceed.
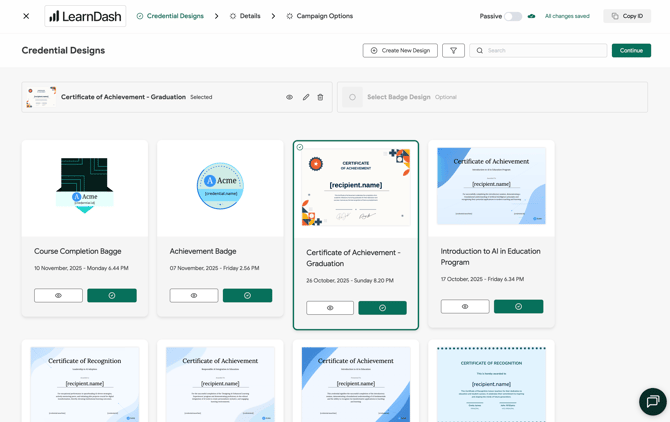
Now you can select the details, add your credential design, and add the email template to the credential sending.
***Design Credential***
Click the green checkmark next to the credential design to select your preferred design. If you do not have a design yet, you can click on **Create New Design** to access the Credential Designer. You can [click here](https://help.sertifier.com/how-to-design-a-certificate?hsLang=en) for more detailed information about the Credential Designer.
***Creating Details***
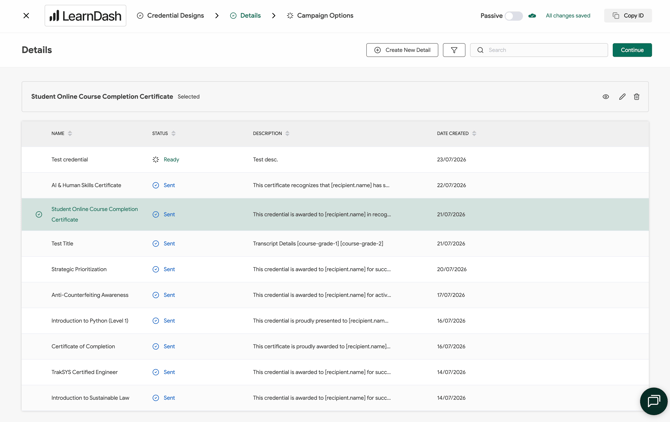
Click the green checkmark to select one of your existing credential details, or click **Create New Detail** to create a new one.
The Credential Details page is where you can input all the essential information for your digital credentials. This section enables you to complete the necessary details for your certificates. [Click here](https://help.sertifier.com/credential-details-complete-guide?hsLang=en) for more detailed information on how to create certificate details.
**Campaign Options**
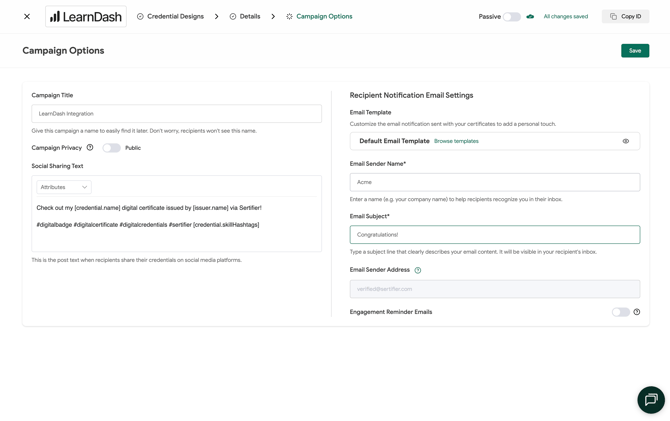
In the **Campaign Options** step, you can customize the Campaign Title, as well as the Social Sharing Text.
Under **Recipient Notification Email Settings**, you will be able to select or create a new custom email template to issue your credentials with by clicking **Browse Templates**.
***Email Template***
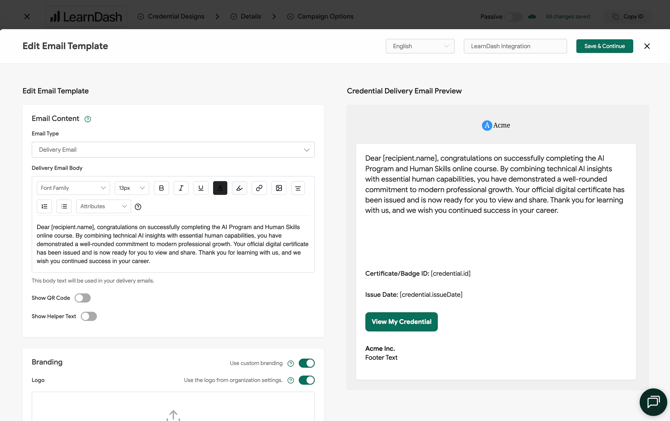
The Email Template tab is where you can customize the email that will be sent to your certificate recipients.
You can find more detailed information [here](https://help.sertifier.com/how-to-create-a-email?hsLang=en).
****
For a complete guide to sending Digital Credentials, you can [click here](https://help.sertifier.com/credentials-complete-guide?hsLang=en).
Once all components are selected and saved, toggle the status of your integrated campaign to **Active**, indicating that the credential is now fully prepared for integration.
Once you integration is active, you can now go back to your LearnDash LMS and select the credential you would like to proceed with. These integrated credentials will be the only type of credentials seen in your LearnDash integration panel.
**Automated Sending**
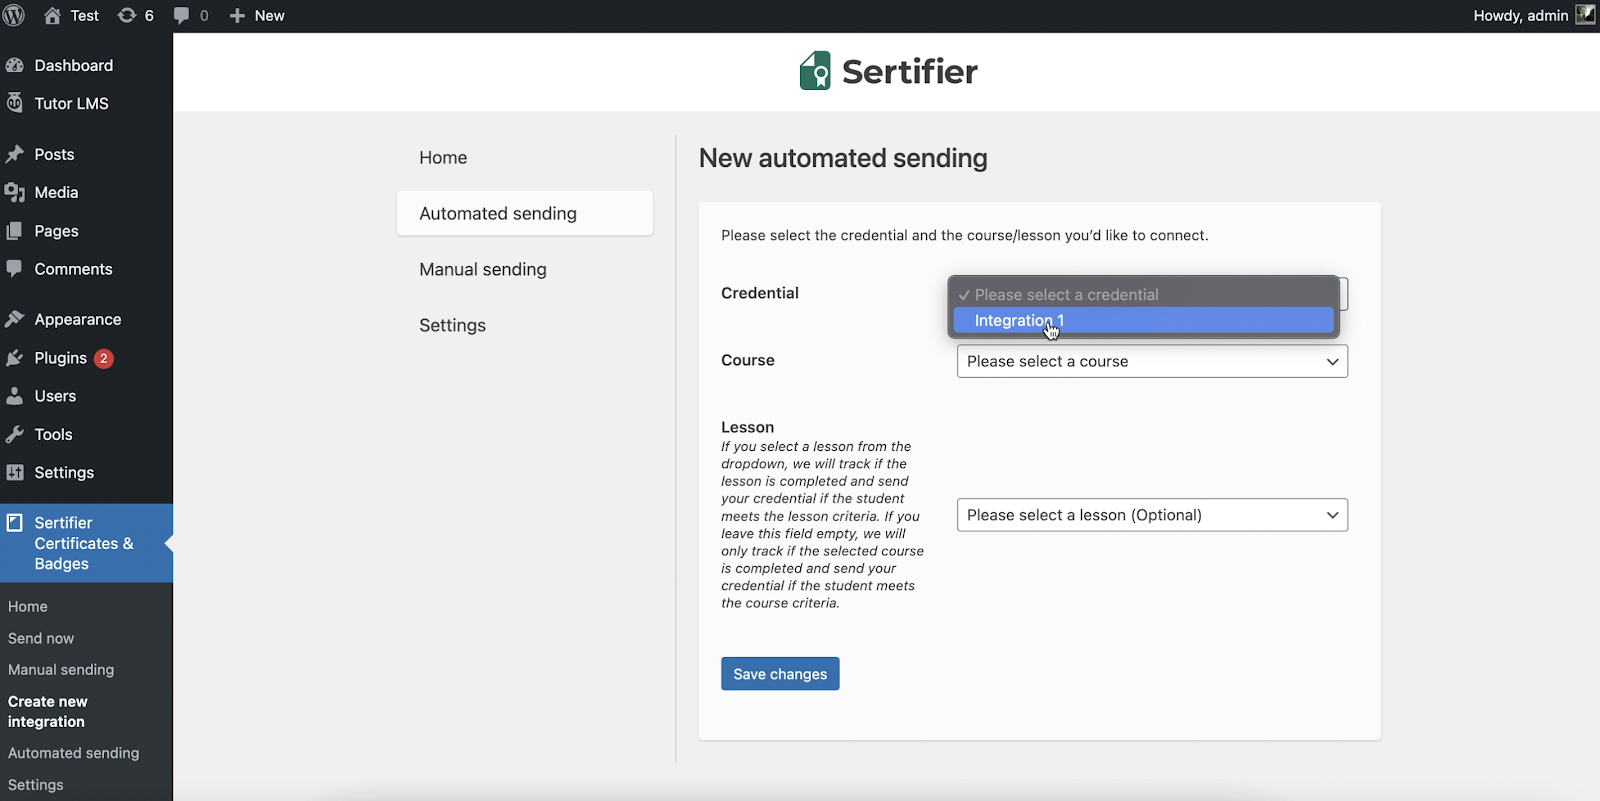
To issue your digital credentials automatically once your students/attendees complete a course, you should select the credential you want it to be automated from the *Automated Sending* menu. Select the credential you want your recipients to receive once they complete that course.
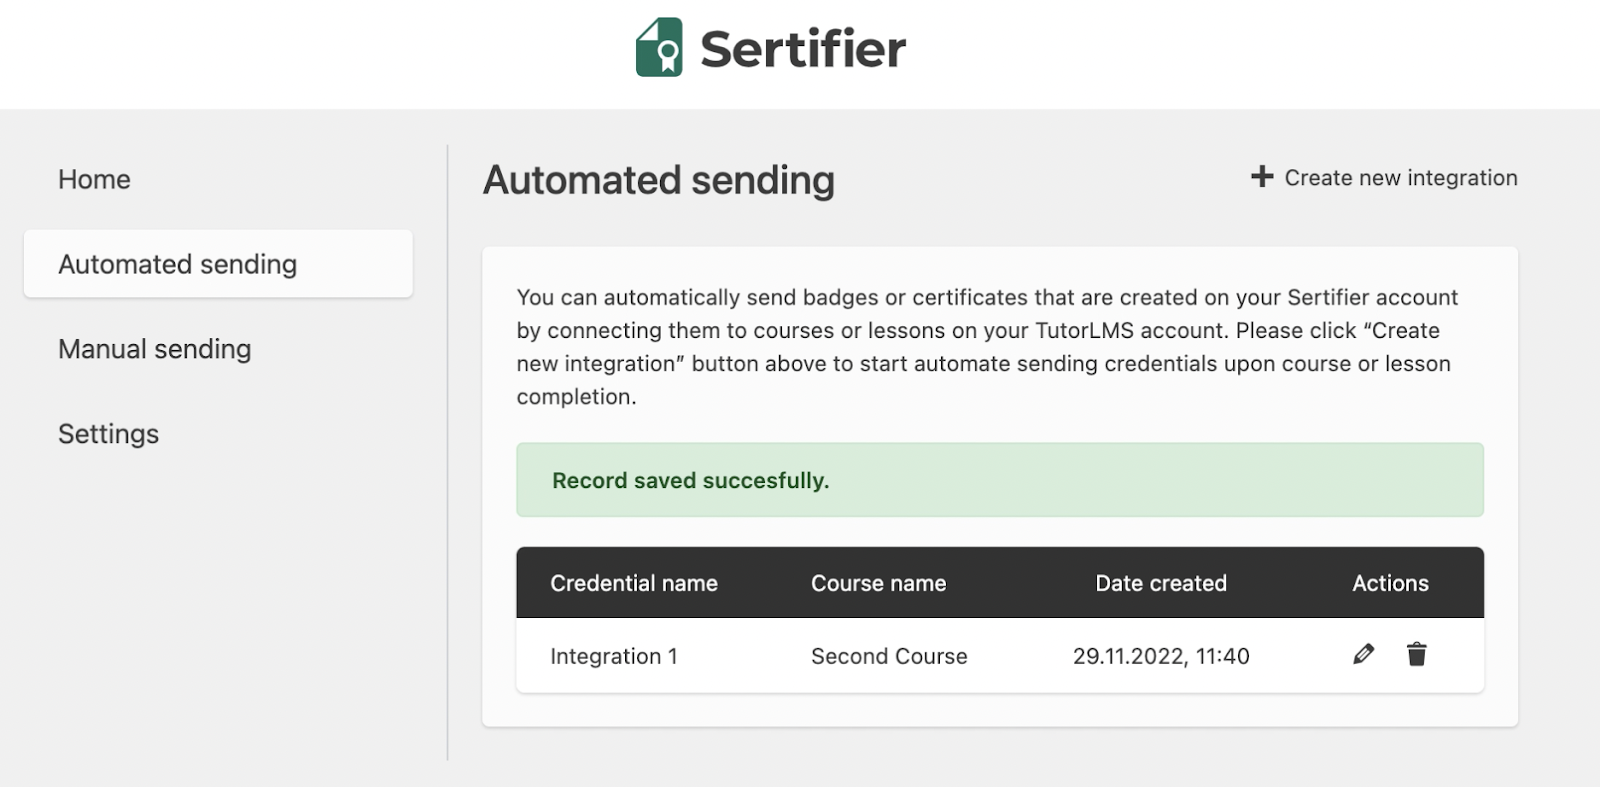
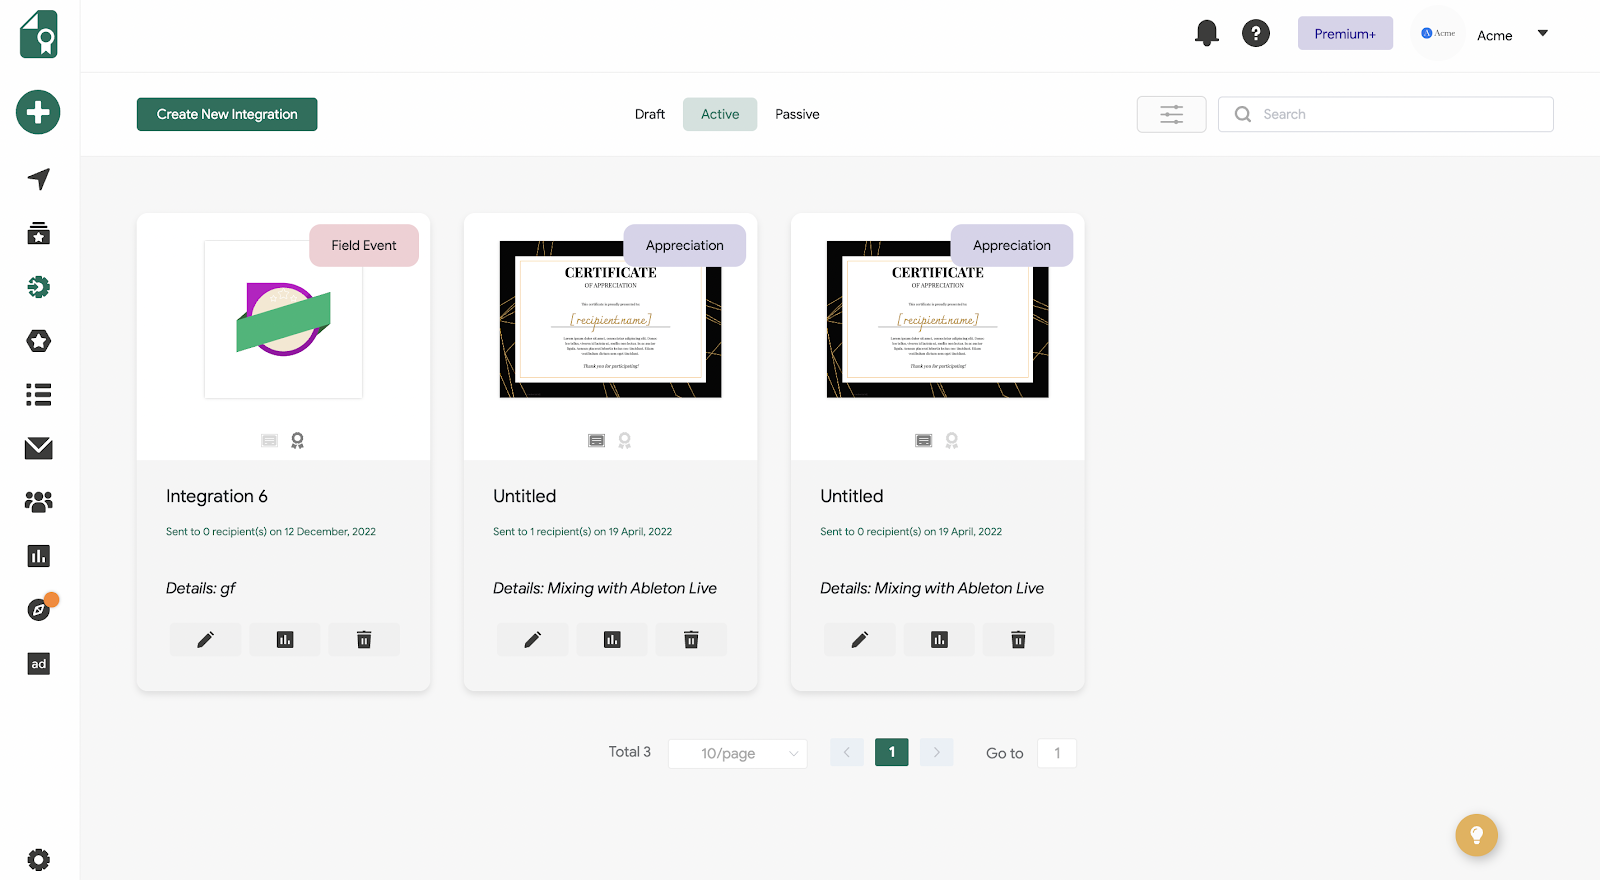
You can see who completed the course and received their credential by going to the *Advanced \>* *Integrations \> Active* tab from the left menu in the Sertifier App, and by clicking the *Analytics* button under the credential.
**Manual Sending**
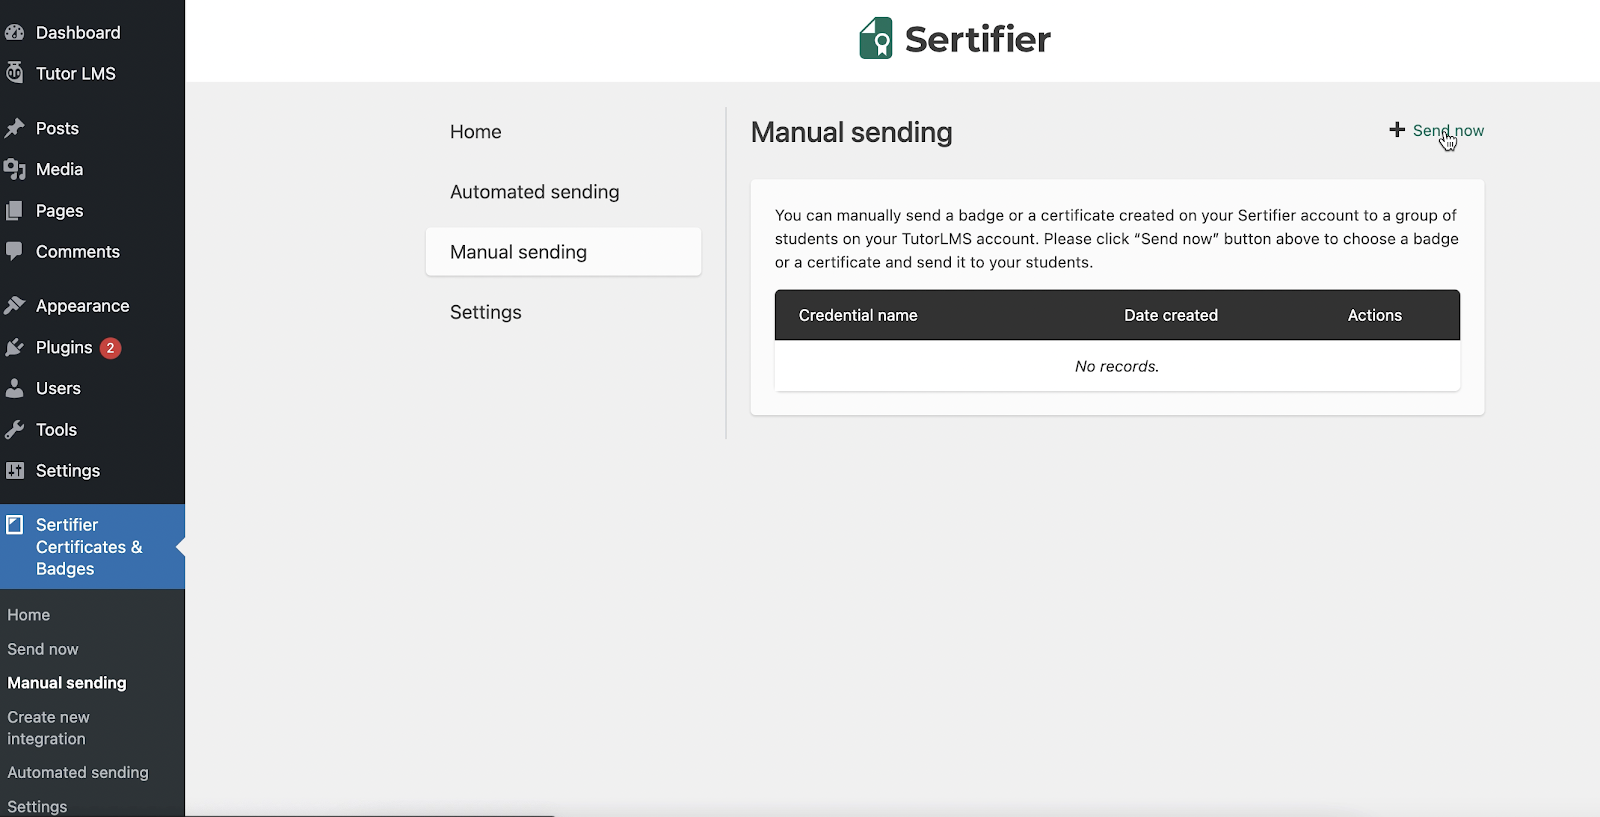
You can manually send a digital badge or certificate that you created on your Sertifier account to a group of students on your LearnDash account.
To issue credentials manually, click the *Send Now* button to choose a credential to send your students. You should choose the credential you would like to issue manually from this list.
Then, you can pick the integrated Credential you created in the Sertifier App. This will be the credential that will be sent to the users you select in the next step.
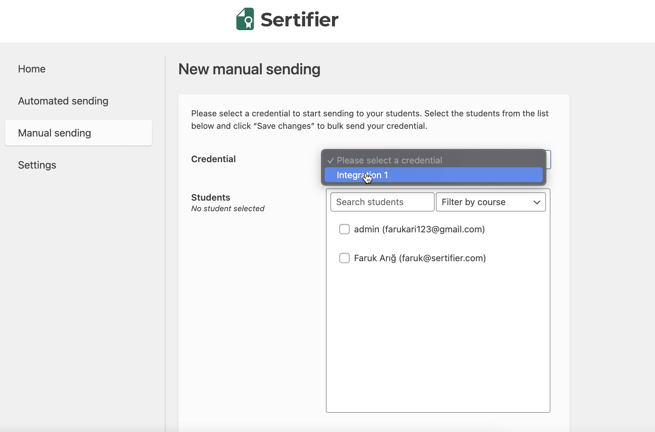
Select the students that you would like to issue credentials, and click *Save Changes.*
Congratulations! You’re all done with the integration.
- [Get Started](https://help.sertifier.com/get-started?hsLang=en#main-content)
- [Your Subscription](https://help.sertifier.com/get-started?hsLang=en#your-subscription)
- [Create & Send Credentials](https://help.sertifier.com/get-started?hsLang=en#create-send-credentials)
- [Track Your Credentials](https://help.sertifier.com/get-started?hsLang=en#track-your-credentials)
- [Connect](https://help.sertifier.com/get-started?hsLang=en#connect)
- [Account Management](https://help.sertifier.com/account-management?hsLang=en#main-content)
- [Organization Settings](https://help.sertifier.com/account-management?hsLang=en#organization-settings)
- [Subscriptions](https://help.sertifier.com/account-management?hsLang=en#subscriptions)
- [Credential Website](https://help.sertifier.com/account-management?hsLang=en#credential-website)
- [Plans & Payment](https://help.sertifier.com/account-management?hsLang=en#plans-payment)
- [Analytics](https://help.sertifier.com/account-management?hsLang=en#analytics)
- [Privacy](https://help.sertifier.com/account-management?hsLang=en#privacy)
- [Utilizing Your Credentials](https://help.sertifier.com/utilizing-your-credentials?hsLang=en#main-content)
- [Verifying and Managing Your Credentials](https://help.sertifier.com/utilizing-your-credentials?hsLang=en#verifying-and-managing-your-credentials)
- [Sharing and Displaying Your Credentials](https://help.sertifier.com/utilizing-your-credentials?hsLang=en#sharing-and-displaying-your-credentials)
- [Using and Customizing Verified Wallet](https://help.sertifier.com/utilizing-your-credentials?hsLang=en#using-and-customizing-verified-wallet)
- [General Recipient FAQs](https://help.sertifier.com/utilizing-your-credentials?hsLang=en#general-recipient-faqs)
- [Generate Digital Credentials](https://help.sertifier.com/generate-digital-credentials?hsLang=en#main-content)
- [Create, Edit and Send Credentials](https://help.sertifier.com/generate-digital-credentials?hsLang=en#create-edit-and-send-credentials)
- [Credential Design](https://help.sertifier.com/generate-digital-credentials?hsLang=en#credential-design)
- [Credential Details](https://help.sertifier.com/generate-digital-credentials?hsLang=en#credential-details)
- [Email Templates](https://help.sertifier.com/generate-digital-credentials?hsLang=en#email-templates)
- [Recipients](https://help.sertifier.com/generate-digital-credentials?hsLang=en#recipients)
- [Attributes](https://help.sertifier.com/generate-digital-credentials?hsLang=en#attributes)
- [Collections](https://help.sertifier.com/generate-digital-credentials?hsLang=en#collections)
- [Pathways](https://help.sertifier.com/generate-digital-credentials?hsLang=en#pathways)
- [Integrations](https://help.sertifier.com/integrations?hsLang=en#main-content)
- [REST API](https://help.sertifier.com/integrations?hsLang=en#rest-api)
- [SSO](https://help.sertifier.com/integrations?hsLang=en#sso)
- [Zapier](https://help.sertifier.com/integrations?hsLang=en#zapier)
- [Zoom](https://help.sertifier.com/integrations?hsLang=en#zoom)
- [Canvas](https://help.sertifier.com/integrations?hsLang=en#canvas)
- [Moodle](https://help.sertifier.com/integrations?hsLang=en#moodle)
- [Mini Course Generator](https://help.sertifier.com/integrations?hsLang=en#mini-course-generator)
- [Thinkific](https://help.sertifier.com/integrations?hsLang=en#thinkific)
- [Tutor LMS](https://help.sertifier.com/integrations?hsLang=en#tutor-lms)
- [LearnDash](https://help.sertifier.com/integrations?hsLang=en#learndash)
- [Adobe Learning Manager](https://help.sertifier.com/integrations?hsLang=en#adobe-learning-manager)
- [Degreed](https://help.sertifier.com/integrations?hsLang=en#degreed)
- [RingCentral](https://help.sertifier.com/integrations?hsLang=en#ringcentral)
- [Absorb LMS](https://help.sertifier.com/integrations?hsLang=en#absorb-lms)
- [Pabbly Connect](https://help.sertifier.com/integrations?hsLang=en#pabbly-connect)
- [GoHighLevel](https://help.sertifier.com/integrations?hsLang=en#gohighlevel)
- [Enocta](https://help.sertifier.com/integrations?hsLang=en#enocta)
- [N8N](https://help.sertifier.com/integrations?hsLang=en#n8n)
- [Make](https://help.sertifier.com/integrations?hsLang=en#make)
- [TypeForm](https://help.sertifier.com/integrations?hsLang=en#typeform)
- [Salesforce](https://help.sertifier.com/integrations?hsLang=en#salesforce)
- [Europass](https://help.sertifier.com/integrations?hsLang=en#europass)
- [FAQ](https://help.sertifier.com/faq?hsLang=en#main-content)
- [Issuing Digital Credentials](https://help.sertifier.com/faq?hsLang=en#issuing-digital-credentials)
[](https://sertifier.com/?hsLang=en)
Copyright © 2025, Sertifier