
Understanding Attribute Types
When creating a Custom Attribute, choose the attribute type that matches the data you plan to display:
- Text: Ideal for recipient names, job titles, departments, or custom award titles.
- Date: Best for issue dates, course completion dates, or expiration dates.
- Number: Useful for candidate IDs, test scores, completed hours, or serial numbers.
- Image: Allows adding dynamic visual elements such as recipient headshots, partner/sponsor logos, or authorized signatures.
Step 1: Creating Custom Attributes
You can create custom attributes directly from three different component editors:
1. From the Certificate Designer
- Navigate to the Attributes section within the credential designer.
- Click the Create Custom Attribute button located at the bottom of the tab.
- Enter a name for your attribute, select the attribute type (Text, Date, Number, or Image), and click Add.
- Position the attribute on your canvas and adjust its color, size, alignment, and placement as needed.
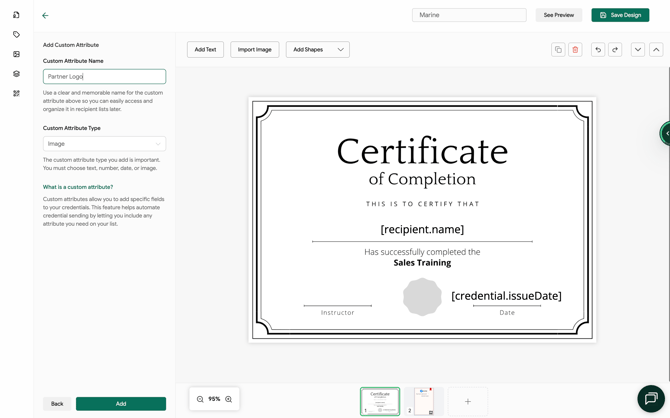
Additionally, you have the option to create a custom attribute directly from the Credential Details or within Email Templates.
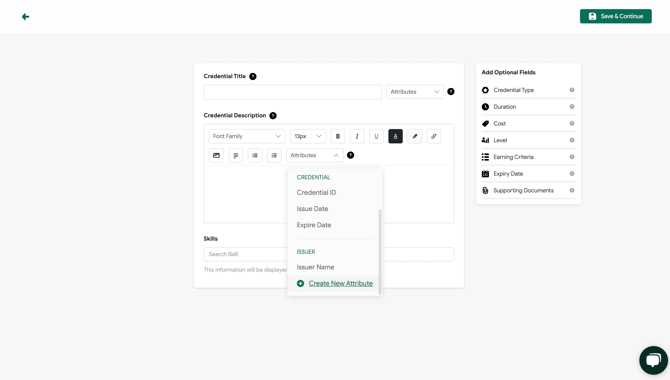
2. From Credential Details
- Open your credential details setup.
- Click on the Attributes dropdown menu located in the Credential Description area.
- Select Create New Attribute at the bottom of the list.
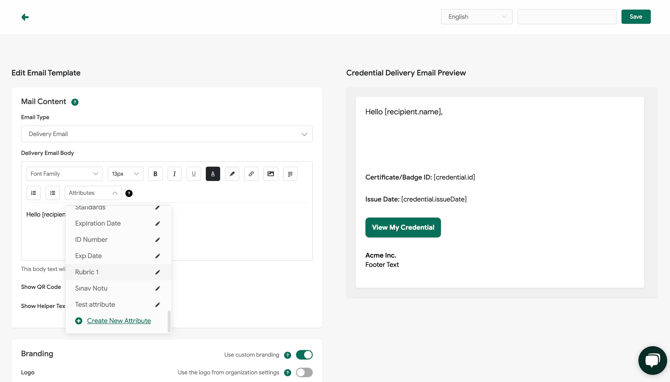
3. From Email Templates
- Open your email template editor.
- Click on the Attributes dropdown menu located in the Email Body area.
- Select Create New Attribute at the bottom of the list.
Step 2: Populating Attribute Data in the Recipients Step
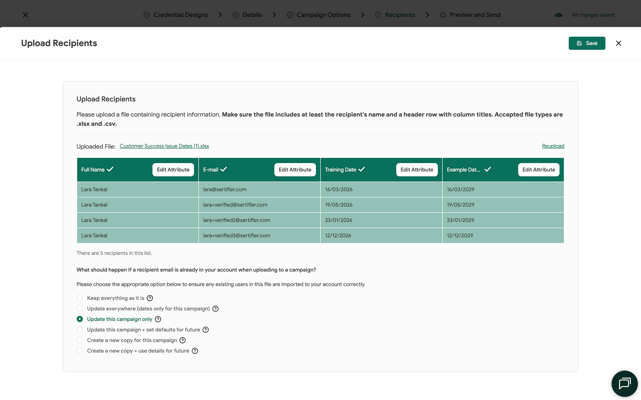
Attribute fields are automatically populated using the recipient data you upload or enter during campaign setup.
For Text, Date, and Number Attributes:
When importing recipient data via Excel or CSV, include a dedicated column for each custom attribute and map it to the corresponding attribute during file import.
Related Article: Guide to Uploading Recipients via Excel or CSV
For Image Attributes:
When using Image attributes, you can provide image files using three distinct methods during the recipient setup step:
- Individual Upload via Image URLs:
- Paste a direct image URL into the attribute value field when adding or editing a recipient manually.
- Google Drive Links: Ensure file sharing permissions are set to "Anyone with the link" so the platform can access and render the image.
- Bulk Upload via URLs (Excel / CSV):
- Create a dedicated column in your file containing image links for each recipient and map it to your image attribute during upload.
- Google Drive Links: Ensure all links are set to "Anyone with the link".
- Bulk Upload via Embedded Images (Excel):
- Insert image files directly into the corresponding cells of your Excel spreadsheet and map the column upon import.
- Note on File Size: Embedded uploads are document-size sensitive. Keep image dimensions optimized, and use image compression tools if you experience file size errors.
Related Article: How to Use Custom Image Attributes
Once your recipient data is uploaded and mapped, all dynamic attribute placeholders—whether text, dates, numbers, or images—will automatically populate across your certificates, verification pages, and email notifications.