How to Set Up Your Sertifier Account: A Step-by-Step Guide
This guide provides a step-by-step walkthrough to help you set up and customize your Sertifier account, ensuring smooth onboarding and optimal use of the platform’s features.
This guide will walk you through the essential settings to get your account up and running.
Accessing Organization Settings
To begin, navigate to Organization Settings. You can find this option in the left-hand menu or by clicking your organization’s name in the top-right corner of the dashboard.
In Organization Settings, you’ll find several key sections:
- Issuer Profile Settings
- General Settings
- Issuer Verification
- Account Preferences
Issuer Profile Settings

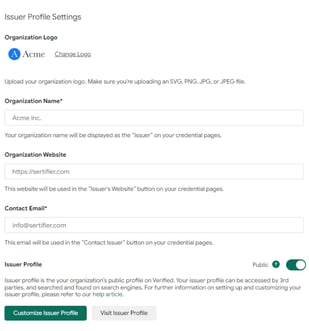
Your Issuer Profile is your organization’s public-facing profile on Verified, which third parties can access and even find through search engines. Here’s how to customize it:
- Logo & Organization Name: Upload your organization’s logo and update your organization name.
- Website URL: Provide your organization’s website link. This can help drive traffic to your site through your issuer profile.
- Contact Email: Ensure you include a contact email address for recipients to reach out if needed.
- Profile Visibility: Manage whether your issuer profile is public or not by toggling the profile status.
- Credential Display: Customize your profile by selecting which credentials, collections, or recipients will be displayed.
You can preview how your profile looks by clicking the **Visit Issuer Profile** button. For a more detailed walkthrough, refer to our Issuer Profile guide.
General Settings

This section helps you integrate your organization’s details with Sertifier.
- LinkedIn Organization ID: Link your LinkedIn company ID to display your company’s information when recipients share digital credentials on LinkedIn.
- Social Media URL: Add your social media account URLs, which will appear on your credential pages, boosting your organization’s visibility.
- Contact Phone Number: Add a contact number for security events or workflow SMS notifications.
- Organization Address: Enter your organization’s official address for accurate records.
Issuer Verification

Sertifier’s integration with Velocity Network Foundation™ allows you to become a verified issuer, providing credibility and security through a blockchain-secured platform. To begin the verification process, follow the steps in the Issuer Verification section of your Organization Settings.
Account Preferences
 In this section, you can manage notification preferences and date formats.
- Date Format: Choose your preferred date format for use across your account.
- Credential Update Notifications: Enable or disable email notifications sent to recipients when you update credential designs, details, or recipient attributes. Simply toggle the settings based on your preference.
Managing Users & Permissions
To manage your team members’ access, navigate to the Users tab under Settings. Here, you can add or remove team members, assign roles, and regulate their permissions.
To add a new user, click Add New User. Input their email address, customize their permissions, and send an invitation.

---
With these steps, your Sertifier account will be set up and ready to go! If you have any further questions or need additional help, don’t hesitate to explore our other support articles or reach out to our team.
---
This format should work well for a help article, providing clear steps and guidance.